IPython各種用法 - 讀書筆記 - Python Data Science Handbook - Python數據科學 - IPython的快捷鍵與神奇的魔術指令 - 原來In[] 和 Out[] 可以這樣用 - IPython...
嗨嗨,如果覺得圖片不清楚,都可以直接參考我的Github喔

1.2章IPython快捷鍵
1. 如何打開IPython shell?
打開Anaconda Prompt,並輸入ipython,按下Enter鍵
2. IPython shell中的快捷鍵
領航快捷鍵(Navigation shortcuts)

文字輸入快捷鍵(Text Entry Shortcuts)

指定歷史的快捷鍵(Command History Shortcuts)

雜項快捷鍵(Miscellaneous Shortcuts)

1.3章 IPython的魔術指令(IPython Magic Commands)
1. %paste & %cpaste - 張貼程式碼
大家應該都有遇到過這個問題,就是複製了網路上的程式碼,直接貼上到我們的編譯器上時,竟然報錯了,這可能是因為編譯器被額外的提示符搞亂了,就可以使用%paste和%cpaste來解決
情況舉例:
原本想複製網路上的程式碼
>>> def add(a,b):
...  return a+b
然後直接複製貼上到IPython會報錯
這時候就可以使用%paste,它專門處理編譯器被一些額外的提示符搞亂了的情況
自己嘗試的結果:但我自己嘗試了書本上的範例發現要很特定的情況下用%paste,才不會報錯,要不然就是原本就不會有錯,感覺基本上它還是張貼的作用
使用說明
- %paste: 一打上去,就會將我們當前複製的程式碼貼上
- %cpaste: 在IPython中輸入後,會出現一個交互式的多行提示符,使我們可以貼上多個程式碼塊,然後批量執行它們
示範一:
In [1]: %paste >>> def add(a,b): ... return a+b ## -- End pasted text -- In [2]: add(2,6) Out[2]: 8 In [3]: %cpaste Pasting code; enter '--' alone on the line to stop or use Ctrl-D. :>>> def add(a,b): :... return a+b :>>> def add(a,b): :... return 2a+2b :>>> def add(a,b): :... return 3a+3b :--
示範二: 在%cpaste中使用%paste
In [1]: %cpaste Pasting code; enter '--' alone on the line to stop or use Ctrl-D. :%paste :-- >>> def add(a,b): ... return a+b ## -- End pasted text --
2. %run - 在IPython中,執行外部的Python檔
- 格式:%run (執行的Python檔名稱)
- 舉例:我們有一個Python檔
## python_script.py def multiply(a,b): '''a multiply of b''' return a*b if __name__ == '__main__': for i in range(10): print(str(i) + ' multiply of ' + str(i+1) + ' : ' , multiply(i,i+1))
- 在IPython中執行這個Python檔,如果沒有給目錄位置,就要到Python檔的目錄位置底下執行喔
%run python_script_demo.py
執行結果
In [1]: %run python_script.py
0 multiply of 1 : 0
1 multiply of 2 : 2
2 multiply of 3 : 6
3 multiply of 4 : 12
4 multiply of 5 : 20
5 multiply of 6 : 30
6 multiply of 7 : 42
7 multiply of 8 : 56
8 multiply of 9 : 72
9 multiply of 10 : 90
執行完後,還能在IPython使用這些在Python檔中定義好的函數
In [2]: multiply(2,8)
Out[2]: 16
3. %timeit - 程式碼執行時間計時,瞭解哪個用法更快
.格式:%timeit (要執行計時的程式碼)
範例一:
In [3]: %timeit new_list = [x**2 for x in range(1000)]
282 µs ± 10.1 µs per loop (mean ± std. dev. of 7 runs, 1000 loops each)
範例二:換個方式寫程式碼,但目的一樣
In [4]: %%timeit
 ...: new_list = []
 ...: for x in range(1000):
 ...:  new_list.append(x**2)
 ...:
317 µs ± 15 µs per loop (mean ± std. dev. of 7 runs, 1000 loops each)
可以看出雖然目的是一樣的,但兩個不同的程式碼寫法,執行時間是不同的喔
補充:如果想在IPython中使用多行就要兩個%,像是%%timeit
4. 如何查詢魔術指令的資訊與列出所有的魔術指令 - ?、%magic、%lsmagic
- ?: 如果想查詢某個魔術指令的資訊,像是%run?
- %magic: 獲得魔術指令的通用敘述與舉例
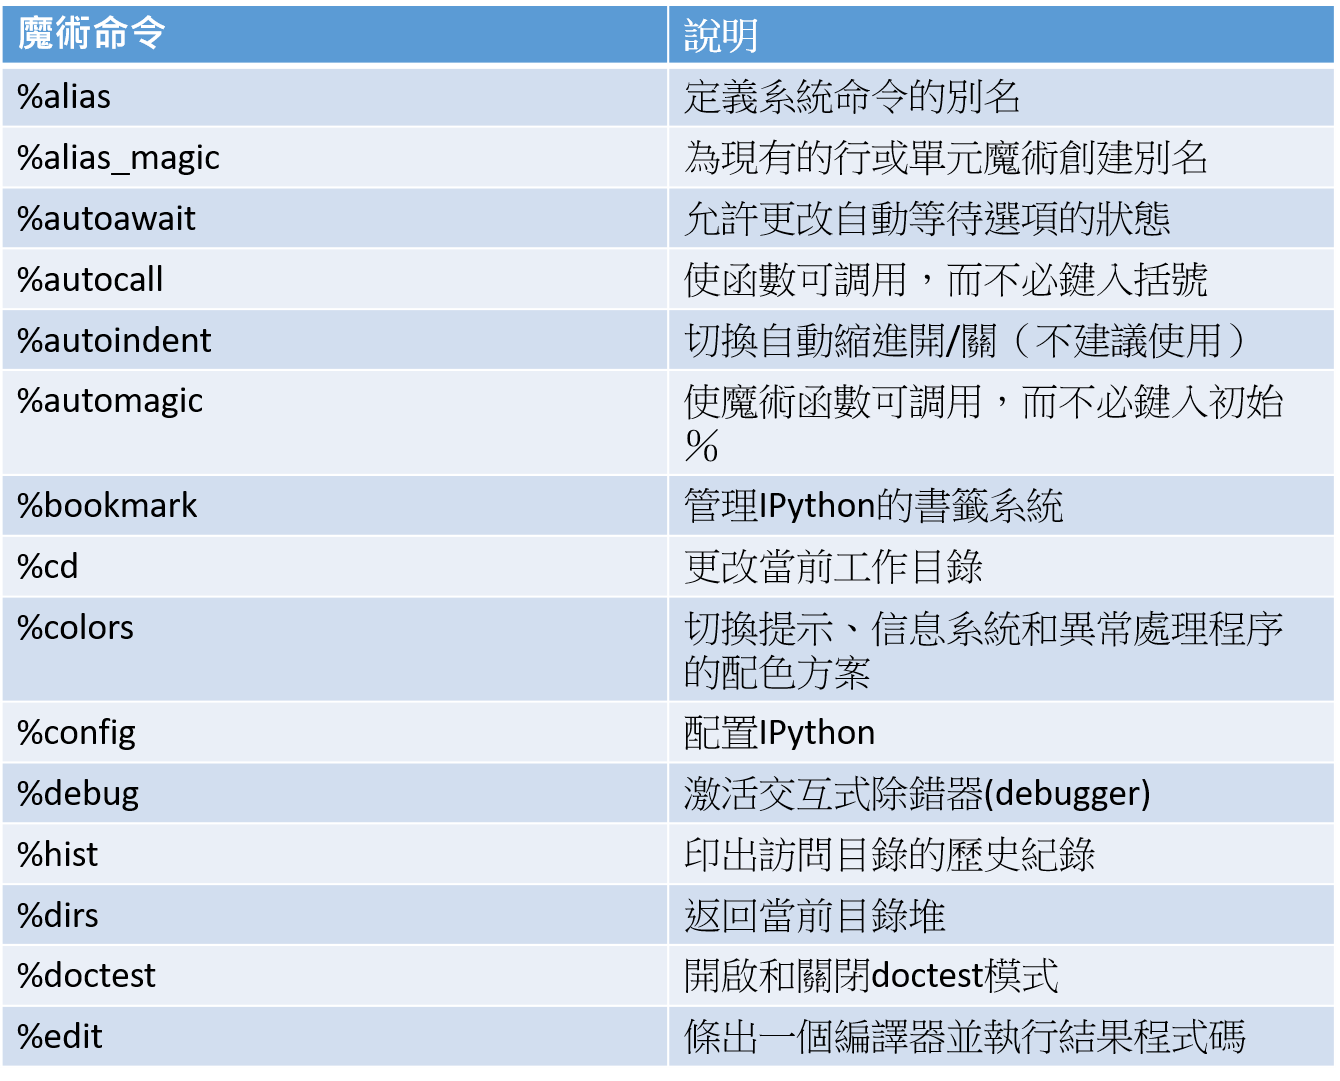
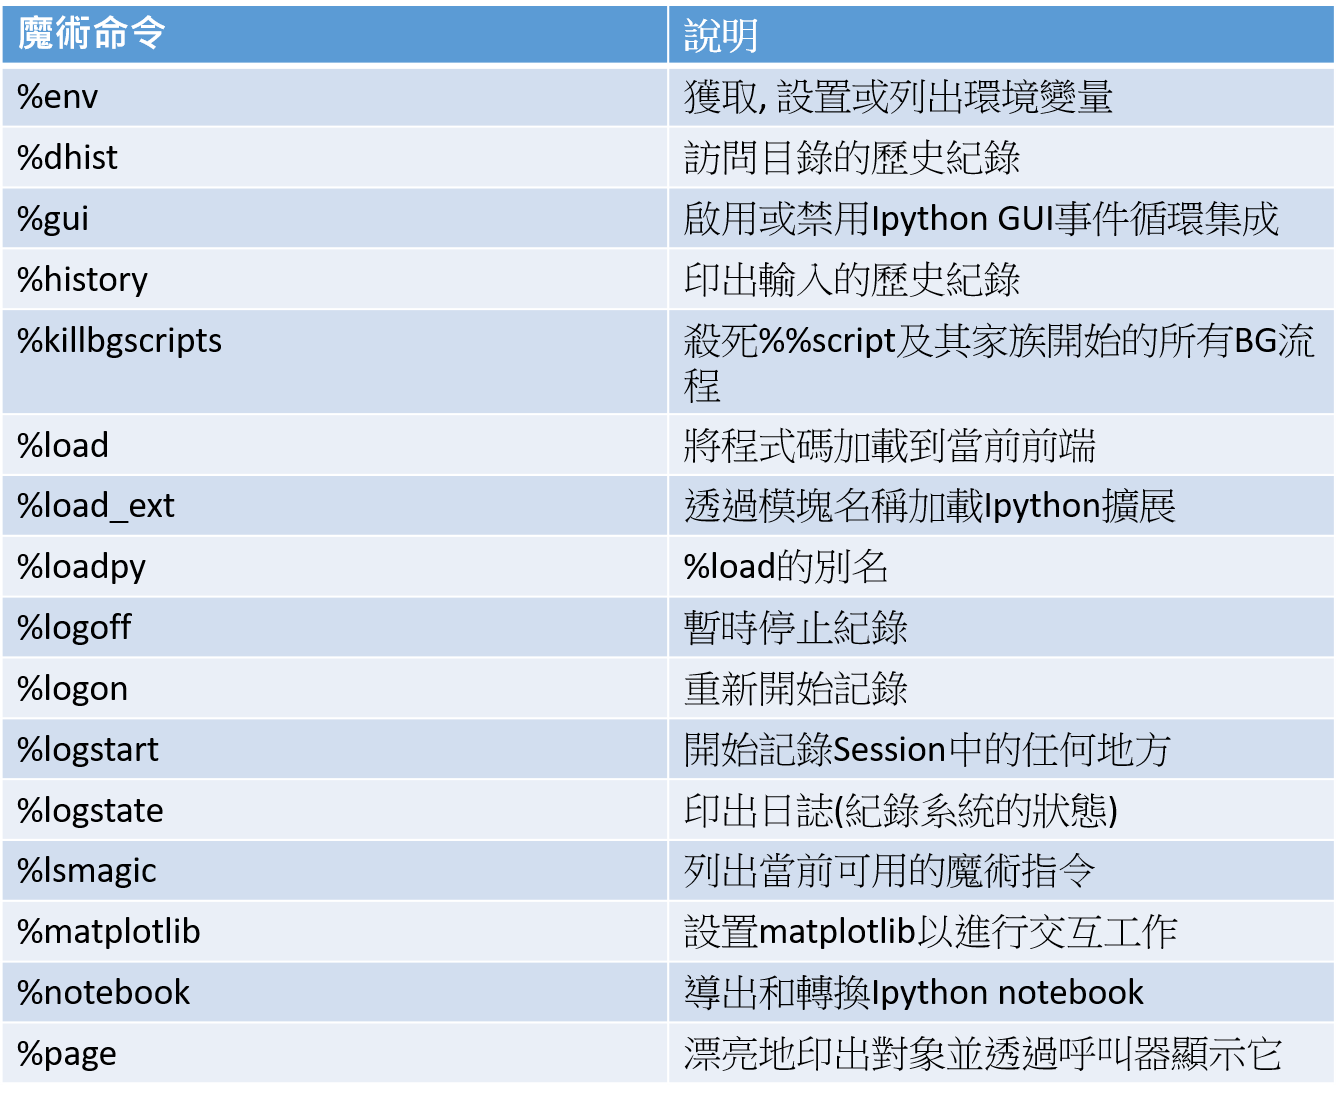
- %lsmagic: 列出所有可用的魔術指令
我這邊列出一些魔術指令喔


1.4章 Input 和 Output 的歷史 - 使用In 和 Out 來獲取歷史記錄
1. In 和 Out 的用法
大家一定都有看到IPython中的提示符 - In[] 和 Out[],但大部分的人以為只是為了美觀所採用的修飾符,但其實它有很厲害的功用的,它能夠讓我們簡單獲得以前的輸入和輸出內容
範例:我們先照著以下的程式執行 - 我們導入math套件,並計算開根號、sin、cos和tan
In [1]: import math In [2]: math.sqrt(2) Out[2]: 1.4142135623730951 In [3]: math.sin(6) Out[3]: -0.27941549819892586 In [4]: math.cos(6) Out[4]: 0.960170286650366 In [5]: math.tan(6) Out[5]: -0.29100619138474915
接下來,利用In和Out列印出我們執行過的輸入與輸出內容
In [6]: In
Out[6]:
['',
'import math',
'math.sqrt(2)',
'math.sin(6)',
'math.cos(6)',
'math.tan(6)',
'In']
In [7]: Out
Out[7]:
{2: 1.4142135623730951,
3: -0.27941549819892586,
4: 0.960170286650366,
5: -0.29100619138474915,
6: ['',
'import math',
'math.sqrt(2)',
'math.sin(6)',
'math.cos(6)',
'math.tan(6)',
'In',
'Out']}
- In: 返回輸入過的內容,會以串列(list)的形式傳回
- Out: 返回輸出過的內容,會以字典的形式回傳
指定我們要看第幾個輸出或輸入
In [8]: print(In[1]) import math In [9]: print(Out[4]) 0.960170286650366
提醒:並不是所有輸入都會有輸出,像是import和print的語句就不會影響輸出(Output)內容,簡單來說就是import和print的結果,會返回None,而任何指令返回None都不會加入到Out中,所以print(Out)會看不到他們的結果
這個方法,對於拿過去的計算結果做運算,是非常方便的
In [1]: import math In [2]: math.sin(6) Out[2]: -0.27941549819892586 In [3]: math.cos(6) Out[3]: 0.960170286650366 In [4]: Out[2]**2 + Out[3]**2 Out[4]: 0.9999999999999999
2. _下滑線用法 - 回到過去的輸出(Output)
想回到上一個輸出結果,就輸入一個""下滑線,前兩個輸出結果就兩個下滑線"",前三個輸出結果就三個下滑線_,但注意沒有以此類推囉XD,IPython最多只支援三個下滑線,而且它會自動跳過沒有輸出結果的命令喔
In [5]: print(_) 0.9999999999999999 In [6]: print(__) 0.960170286650366 In [7]: print(___) -0.27941549819892586
也可以使用 格式:_ (第幾個輸出結果)來直接印出之前的輸出結果,像是我們會寫Out[4]來引出第四個輸出結果,而這邊有個更簡潔的寫法_4
In [8]: Out[4] Out[8]: 0.9999999999999999 In [9]: _4 Out[9]: 0.9999999999999999
3. ";" - 不要將執行結果,加入道輸出結果的歷史中
- 只要在指令後面加上";",就不會將這次的執行結果加入到Out裡
In [16]: math.sin(6)**2 + math.cos(6)**2; In [17]: Out[16] --------------------------------------------------------------------------- KeyError Traceback (most recent call last)in ----> 1 Out[16] KeyError: 16 In [18]: 16 in Out Out[18]: False
4. %history 批量查看歷史記錄(Input)
可以查看過去第幾個的輸入(Input)
- 範例:我想查看過去第一到第四個輸入(Input)與第一到第五個輸入(Input)
In [1]: import math
In [2]: math.sin(6)
Out[2]: -0.27941549819892586
In [3]: math.cos(6)
Out[3]: 0.960170286650366
In [4]: math.tan(6)
Out[4]: -0.29100619138474915
In [5]: print(Out)
{2: -0.27941549819892586, 3: 0.960170286650366, 4: -0.29100619138474915}
In [6]: %history -n 1-4
1: import math
2: math.sin(6)
3: math.cos(6)
4: math.tan(6)
In [7]: %history -n 1-5
1: import math
2: math.sin(6)
3: math.cos(6)
4: math.tan(6)
5: print(Out)
1.5章 IPython 和 Shell 指令 - 如何在IPython中下達Shell指令 - ls、cd、mkdir等等
- 在Python環境中,當我們想要一邊下達對操作系統的Shell指令,一邊撰寫Python,我們只能再開一個終端窗口,或是退出Python環境,然後下達完指令,再切回Python,但是IPython可以讓我們同時在它的環境下,做到這兩種事
1. "!" - 輕鬆幫我們在IPython Shell中,執行Shell指令
In [2]: ls 磁碟區 C 中的磁碟是 Windows 磁碟區序號: 1C71-9B46 C:\Users\user\Desktop\Book\Python-Data-Science-Handbook-Personal-Note\IPython-introduction\images 的目錄 2021/02/10 下午 12:10. 2021/02/10 下午 12:10 .. 2020/11/28 下午 12:26 21,909 Command History Shortcuts.png 2020/11/24 下午 08:27 6,225 image1.PNG 2020/11/24 下午 08:30 55,914 image2.png 2020/11/24 下午 08:35 110,153 image3.png 2020/11/24 下午 08:37 138,940 image4.png 2020/11/24 下午 08:40 159,651 image5.png 2020/11/24 下午 08:41 239,450 image6.png 2021/02/10 下午 12:09 104,667 magic_function1.png 2021/02/10 下午 12:10 105,858 magic_function2.png 2020/11/28 下午 12:29 15,005 Miscellaneous Shortcuts.png 2020/11/28 下午 12:19 27,758 Navigation shortcuts.png 2020/11/28 下午 12:23 35,943 Text Entry Shortcuts.png 12 個檔案 1,021,473 位元組 2 個目錄 35,393,601,536 位元組可用 In [3]: pwd Out[3]: 'C:\\Users\\user\\Desktop\\Book\\Python-Data-Science-Handbook-Personal-Note\\IPython-introduction\\images' In [4]: !echo "Shell command - Printing" "Shell command - Printing""
我自己試了在Windoes系統中,如果不加!會有作用嗎,發現也會有喔!!但是加了!,看起來更簡潔清楚
2. 從Shell中傳回值,並保存成一個看似Python的列表,但多了一些功能的列表
In [8]: file_list = !ls
In [9]: print(file_list)
["'ls' ���O�����Υ~���R�O�B�i���檺�{���Χ妸�ɡC"]
In [10]: directory_list = !pwd
In [11]: type(directory_list)
Out[11]: IPython.utils.text.SList
從印出的類型來看,它看起來像是Python的列表(list),但是多了一些額外的功能,像是grep和fields方法,以及s、n和p屬性,使我們能夠用簡單的方式進行搜索、過濾和顯示結果 file_list?
3. 從Python中傳值給Shell使用
- Python也可以傳變數名稱給Shell使用,只要透過{變數名稱}即可
In [12]: context = "Values from Python"
In [13]: !echo {context}
Values from Python
In [14]: echo {context}
Values from Python
4. !cd 沒辦法在IPython中移動目錄位置
- 原因:因為notebook中的Shell是在一個暫時的子Shell空間中運行的
- 解決辦法:將!cd指令改成%cd或cd
- 補充:除了%cd,其它相似的Shell指令,像是%cat、%cp、%env、%ls、%rmdir、%mkdir、%more、%rm、%pwd、%man和%mv,這些魔術命令在automagic啟動(打上%automagic來啟動或關閉)時都可以不用有%就能使用,也就是把IPython shell當成我們系統的shell使用
1.6章 Errors and Debugging - 非常重要的錯誤與除錯功能
1. %xmode - Controlling Exception - 異常控制 - Plain、Context和Verbose
- %xmode - Exception mode的縮寫,用來控制異常發生時,錯誤訊息的數量
- 模式:Plain、Context、Verbose,預設為Context
- 使用方法:%xmode (一種模式名稱)
一般情況下,當程式出現錯誤時,系統會報的錯誤資訊
def divided(a, b): c = b - 1 return a/c divided(8,1)
執行結果
--------------------------------------------------------------------------- ZeroDivisionError Traceback (most recent call last)in 3 return a/c 4 ----> 5 divided(8,1) in divided(a, b) 1 def divided(a, b): 2 c = b - 1 ----> 3 return a/c 4 5 divided(8,1) ZeroDivisionError: division by zero
當編譯器遇到了異常狀況的時候,會將錯誤產生的原因壓縮到眼前程式執行的追溯(Traceback)中,而IPython使我們可以控制異常發生時錯誤訊息的數量
2. Context模式: 預設模式
%xmode Context def divided(a, b): c = b - 1 return a/c divided(8,1)
執行結果
Exception reporting mode: Context --------------------------------------------------------------------------- ZeroDivisionError Traceback (most recent call last)in 5 return a/c 6 ----> 7 divided(8,1) in divided(a, b) 3 def divided(a, b): 4 c = b - 1 ----> 5 return a/c 6 7 divided(8,1) ZeroDivisionError: division by zero
3. Plain模式:更簡短的,較少的錯誤資訊內容
%xmode Plain def divided(a, b): c = b - 1 return a/c divided(8,1)
執行結果
Exception reporting mode: Plain Traceback (most recent call last): File "", line 7, in divided(8,1) File " ", line 5, in divided return a/c ZeroDivisionError: division by zero
4. Verbose模式:更多訊息,包括函數調用時的參數值
%xmode Verbose def divided(a, b): c = b - 1 return a/c divided(8,1)
執行結果
Exception reporting mode: Verbose --------------------------------------------------------------------------- ZeroDivisionError Traceback (most recent call last)in 5 return a/c 6 ----> 7 divided(8,1) global divided = in divided(a=8, b=1) 3 def divided(a, b): 4 c = b - 1 ----> 5 return a/c a = 8 c = 0 6 7 divided(8,1) ZeroDivisionError: division by zero
Verbose可以擁有那麼多的錯誤資訊,為什麼不都用它就好?
當我們的程式越來越多的時候,太多的訊息很難閱讀,所以要視情況,有時候簡短才能幫助我們快速進行除錯(Debugging)喔
5. %debug 進階用法 - 當Traceback已經不能滿足問題
- Python - 標準Python下有一個交互式的除錯工具 - pdb
- IPython - 有一個增強版的除錯工具 - ipdb
ipdbb是什麼?
ipdbb讓我們可以查看當前的Traceback訊息,還可以顯示變數與它們的值,甚至還能直接執行Python命令
當執行%debug,就會啟動ipdbb交互式界面,讓我們查詢變數值等等功能
%debug
範例:像是我們現在有一個程式執行的時候會報錯
def divided(a, b): c = b - 1 return a/c divided(8,1)
這時候就執行%debug,來開啟ipdbb
%debug
使用print來得知變數值
>(3)divided() 1 def divided(a, b): 2 c = b - 1 ----> 3 return a/c 4 5 divided(8,1) ipdb> print(a) 8 ipdb> print(b) 1 ipdb> print(c) 0 ipdb> print(a/c) *** ZeroDivisionError: division by zero ipdb> quit
使用up、down來回溯上一層或下一層,當很多個Function互相調用(call)對方時,幫助我們從眾多Function中找尋哪個Function出問題
>(3)divided() 1 def divided(a, b): 2 c = b - 1 ----> 3 return a/c 4 5 divided(8,1) ipdb> up > (5) () 1 def divided(a, b): 2 c = b - 1 3 return a/c 4 ----> 5 divided(8,1) ipdb> down > (3)divided() 1 def divided(a, b): 2 c = b - 1 ----> 3 return a/c 4 5 divided(8,1)
如何將除錯工具ipdbb保持啟動的狀態,程式執行報錯就會馬上開啟
- 使用%pdb,後面加上on/off 來開啟或關閉除錯工具的自動開啟模式
- 使用方法:%pdb (on/off)
%xmode Verbose %pdb on def divided(a, b): c = b - 1 return a/c divided(8,1)
執行結果
Exception reporting mode: Verbose Automatic pdb calling has been turned ON --------------------------------------------------------------------------- ZeroDivisionError Traceback (most recent call last)in 7 return a/c 8 ----> 9 divided(8,1) global divided = in divided(a=8, b=1) 5 def divided(a, b): 6 c = b - 1 ----> 7 return a/c a = 8 c = 0 8 9 divided(8,1) ZeroDivisionError: division by zero ipdb> > (7)divided() 5 def divided(a, b): 6 c = b - 1 ----> 7 return a/c 8 9 divided(8,1)
外部的Python檔,如何在IPython中交互式的執行,並且同時打開除錯工具 - ipdbb
- 使用%run -d來執行Python檔,然後使用next在交互模式下進行一步一步執行Python檔中的程式
In [1]: %run python_script.py 0 multiply of 1 : 0 1 multiply of 2 : 2 2 multiply of 3 : 6 3 multiply of 4 : 12 4 multiply of 5 : 20 5 multiply of 6 : 30 6 multiply of 7 : 42 7 multiply of 8 : 56 8 multiply of 9 : 72 9 multiply of 10 : 90 In [2]: %run -d python_script.py *** Blank or comment *** Blank or comment *** Blank or comment NOTE: Enter 'c' at the ipdb> prompt to continue execution. > c:\users\user\desktop\book\python-data-science-handbook-personal-note\ipython-introduction\python_script.py(3)() 1 ## python_script.py 2 ----> 3 def multiply(a,b): 4 '''a multiply of b''' 5 ipdb>
開啟除錯模式ipdbb,可以下達的命令

ipdbb 的官方文檔:https//github.com/gotcha/ipdb